Monday, May 10, 2010

Continuous Applique with Stipple! Seashells

 
We recieved a question from one of our customers and we wanted to share the answer with everybody!

"I love your Stipple sea shells. I don't have a magna hoop and I am not sure you have one for the Janome 11000. I don't see it working the same way. Could you help me? I am very interested. -Maxine"

Yes, you can create continuous appliqué with Stipple! Seashells. All you need is a large embroidery hoop and templates. Follow the steps below to achieve success.

Print a template of the Waveborder design on vellum or tracing paper.

Make a 12” x 44” quilt sandwich of backing, batting and top fabric to make two 3 ½” x 40” borders. Hoop the upper left portion of the quilt sandwich. Stitch the Waveborder design at the top left of the sewing field. Add the applique as instructed in the Stipple! Shell Collection. Once complete, remove the quilt sandwich from the hoop.

Reposition the fabric to connect the next design with the previously stitched design. Keep the applique strip out of the design area while hooping.

Once hooped, smooth the applique fabric over the new sewing field.


Place the Waveborder template in the hoop, aligning the top of the new design with the bottom of the previously stitched design.


Your goal is to connect the design as shown below.


You can hold onto the template and carefully slide the left side of the applique strip to the right to reveal the straight stitches. You want the stitched line on the template to match up with the stitching on the fabric.


Once you’re satisfied that everything matches up, securely tape or pin the template to the hooped fabric. Or slide a target sticker under the template’s crosshair.


Carefully slide the applique strip out from under the template, (just fold it back over itself at the top of the hoop).


Attach the hoop to the machine.


Use the jog keys to move the needle to the center of the template’s crosshair.


Use the trace feature on the machine to position the needle at the upper left corner of the design. The needle should be aligned with the straight line on the first design. If not, move the design.


Make sure the design is in the correct orientation on the screen (matching the orientation of the template). Remove the template.

Stitch color 1. Smooth the applique strip down over the first color and stitch color two, the tackdown. Insert


Repeat until you have stitched the complete design. In the image below, the first design was stitched in the bean stitch version of the design, while the second repeat was stitched in the run version. I did this so you could see where one design ended and the next one began.


Thanks for your question, Maxine!

Maxine's question was about a Design's in Machine Embroidery product called Stipple! Seashells.  You can find more information here.

Here's a video that talks about our newest Stipple! Collection.


Friday, May 7, 2010

Mother's Day

Mother's Day

As a mom, I think Mother’s Day is overrated. A bouquet of flowers doesn’t erase a year of dirty clothes on the floor. A box of chocolates doesn’t mend ugly, unkind words spilled in a moment of anger. A fancy brunch doesn’t mean you love your mom if you don’t talk to her on a regular basis. Keep the gifts and the frills. Sit beside your mom and tell her how your life is working out. Assure her that some of the things she taught you are actually helping you deal with many of life’s challenges. Tell her when you are faced with temptation; you hear her voice in your head encouraging you to take the right path. Tell her you forgive her for her shortcomings. Tell her she did a good job of being there for you, of guiding you in the right direction, for letting you spread your wings and fly. Tell her you are grateful for the life you are leading. Tell her your joys and your sorrows. Tell her all of it, don’t buy any gifts, just open your heart to your momma. She loves you.

Happy Mother’s Day to you – I hope you get to share it with those you have nurtured or have nurtured you!

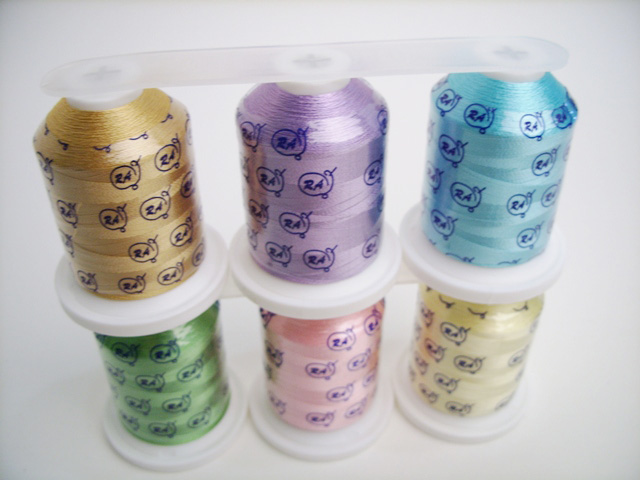
For this week’s giveaway we’ve hand selected 6 of our favorite pastel thread colors from Robison-Anton. These Mini-King spools of rayon thread include Pale Yellow, Pink, Spruce, Penny, Tulip and Sea Mist.  They are the perfect shades to stitch your own floral bouquet!


For a chance to win, simply share your memories of when your mother taught you how to sew. Did you sew a set of linens for the home? Maybe the two of you worked together on a new dress for a special event. Or maybe, you taught your mother how to sew! Post your comment for a chance to win!

 
The lucky winner of the Embroider It Yourself Series—Little Black Tee is…Gail!

grammaheh1 said...
My first project was of a turtle stitched out on a t shirt. It stitched out beautifully, except for the colors. Being a newby, I exactly followed the colors that showed up on my D 1 screen. Unfortunately, they were not the colors of a turtle...
Gail
May 3, 2010 5:19 PM

Congratulations, Gail! Be sure to email Amanda at agriffin@dzgns.com to give us your address so we can send you your gift!


Friday, April 30, 2010

Free Grommet Designs and Winner from last week!

The lucky winner of the Wisteria Binder Kit and Contemporary Machine Embroidered Quilts is…Sara!

"Sara said... April 27, 2010 4:21 PM
I was thrilled to finally get my embroidery machine. I did not know there were so many things that you could do with them. I learned how to do paper piece quilting by doing it on my embroidery machine. In fact my first two projects I ever created on my embroidery machine were a paper pieced Christmas stocking and an applique Christmas ball to hang on my tree. My machine came with a pretty basic autostitch program for digitizing and I was able to create the stitches for both of my projects using simple outlines and sending different color blocks to the machine multiple times. That was a few years ago. Since then I have learned to hand punch my designs and have been learning to do free hand quilting. My best advice I can give to anyone is to have fun and don't be afraid to make a mistake. Sometimes we are our own worst critics."

Congratulations, Sara!  We hope you enjoy your project kit. 
Check out how easy it is to draw a winner. We popped over to http://www.random.org/ and entered the number of comments. With just the click of a mouse, the winning number is pulled. Fair, fast and fun! Maybe this week you’ll be a winner. Even if you don’t win the Denim Collection and Denim Fashion Guide, you’re still a winner because I’ve posted two free grommet designs.  Just click here to download.


Why grommet designs? Rinda, an avid Designs reader wrote and asked for a resource for embroidered grommets just like the ones Deborah Lashbrook taught in “Don't buy Grommets, Make Eyelets” published in the Jan/Feb 2010 issue. Deborah provided digitizing instructions for making large eyelets – perfect for threading a curtain rod through but I know many of you don’t digitize so I did it for you. And along the way, I learned a few things.
There’s a great little rotary cutter that does a fine job of slicing open the circles. It has a guide for your index finger. It takes a minute or two to get used to it but it’s ideal for going around tight curves – like a 1” circle!  Look for it at your local craft store.

The grommet designs are basically an applique but instead of adding fabric you are removing fabric. Hoop your fabric (my sample is actually a quilt sandwich) and stabilizer. Stitch the first two colors. Remove the hoop from the machine and place it on a cutting mat. Use the small rotary cutter to slice away the fabric and stabilizer from the inner circle. Reattach the hoop to the machine and stitch the final color, the satin stitch outline.

I opted to skip the satin stitch and apply large plastic grommets to the quilt sandwich (this will eventually be a handbag).


I love these grommets – you’ll find them in the home décor department of most fabric chain stores. They have two sides, one male and one female.

Stitch the first two colors of the grommet design (stitch a sample to make sure it fits your purchased grommets). Remove from the hoop and place it on a cutting mat.

Use the small rotary cutter to cut open the inner circle.

Slice close to the stitching.

Insert the male grommet from the wrong side of the fabric.

Place the female side on top and press together.

Voila! It’s so easy, I love these things! You’ll find dozens of uses for grommets.

It’s t-shirt season and we want to help you look your best! This week we have chosen to giveaway Eileen’s
Embroider It Yourself Series—Little Black Tee to one lucky embroiderer!


We want to hear about your first embroidery project! Did you make a garment, a quilt or perhaps monogrammed linens? Was your first project a success? A complete disaster? What did you learn from the experience?

Post your comments between April 30 and May 6 for your chance to win. The winner will be announced on May 7 along with a new giveaway!!

The Little Black Details:

Watch Designs Editor Eileen Roche, as she transforms simple tee shirts and turtlenecks into fabulous, fashionable tops with embroidered lace. The CD includes 4 basic t-shirt makeovers, 30+ minute instructional video, printable instructions and 6 lace embroidery designs.


Embroidery formats include ART, DST, EXP, PES, SHV, XXX


(Minimum 5” x 7” hoop required)

Total Value: $49.99!

Thursday, April 22, 2010

Inspiration is blooming this season on Eileen’s new Blog!

Recently, I was reviewing video that we taped here at Designs. A smile crept across my face when I noticed my Wisteria quilt hanging in the background. I love that quilt. It doesn’t really fit in the décor of my home anymore so it usually lives in the office or travels in my trunk show. But whenever I spot it, it brings back a flood of fond memories.


 The Wisteria Quilt adorns the cover of my first book, Contemporary Machine-Embroidered Quilts. I enjoyed the challenge of making the quilt and writing the book. I was delighted when it was accepted to hang in the show at Quilt Festival (Houston, TX) in 2004. It didn’t win a ribbon – and didn’t deserve a ribbon – but what a thrill to walk the hallowed aisles of Quilt Festival and see it.

My style has changed through the years so many of you, if you’re new to Designs, might find the delicate look of the Wisteria Quilt a bit surprising. Today, my work is bolder, brighter and a bit more contemporary. But I learned so much from creating all of the quilts showcased in Contemporary Machine-Embroidered Quilts. As you know, quilting is truly a labor of love but doesn’t have to be a huge time commitment. You can start small with our Spring Bundle.
We’re giving away one Spring Bundle to jump start your creativity – all you have to do is post your comment about quilting with your embroidery machine for a chance to win!  Share with us your favorite quilting tips, your worst quilting disasters or let us know about your current project.  Post your comments between April 23rd and April 29th for your chance to win.  The winner will be announced on Friday, April 30th along with a new giveaway!!   

Spring Bundle includes:
• Wisteria Journal Project Kit! (A $25 value) FREE!
• Personally, autographed copy of Contemporary Machine-Embroidered Quilts (A $27.99 value) FREE!
Total Value: Over $52.99!

Spring Bundle Details:

Contemporary Machine-Embroidered Quilts features 144 pages of inspiration and a CD with 14 multi-format embroidery designs*. Eileen provides step-by-step instructions to make 12 quilt projects including the Wisteria Quilt, Wisteria Blooms and the Wisteria Pillow.

Wisteria Journal Project Kit
We provide the essential materials and the instructions to make your own Wisteria Journal inspired by Contemporary Machine-Embroidered Quilts.

Personalize the journal cover by adding beads, trim, and other accessories to make it your own. You’ll learn Eileen’s techniques to adding depth to your projects with the use of tulle. Make the journal cover to store project inspiration, swatches of fabrics, CDs, family photos, etc.

Kit includes:
• Complete printed instructions to make the Wisteria Journal
• ½ yard green batik fabric
• one 6” x 9” block of dark tulle
• fat quarter of brown cotton fabric (bark)
• batting: 25” x 13”
• Pellon ShirTailor interfacing
• Polymesh stabilizer
• Paper-backed fusible web

14 large format embroidery designs included!

Additional materials will be required and are listed in the instructions. 3-ring binder not included.

Monday, March 8, 2010

A Little TLC for Your Machine

Many embroiderers ask how to maintain their embroidery machine. It is always best to get a quick lesson from your machine dealer on how to properly care for your machine. A guided tour of the inside of the machine bed by an experienced machine repair person will give you added confidence when tackling this on your own. However, I'm happy to share what I do to keep my machines in tiptop shape.

Prepare the machine to be cleaned. Turn the machine off. Remove the foot and needle. Remove the bobbin cover and throat plate. If you've never done this before, take a photograph of the bobbin basket in the machine bed BEFORE you remove it. Use the photograph as a reference when reinserting the basket.


Remove the bobbin and the basket. Yikes! Talk about airing your dirty laundry!


Take a pipe cleaner and bend the tip over about 1". Twist the double layer to smooth into one form.


Clean the between the toes of the feed dogs.


Swipe the inside of the bobbin area and around the perimeter of the bobbin area.

Rotate the hand wheel a half turn and swipe the area again. Remove any fuzz from the pipe cleaner before sticking it back into the machine. If there are some stubborn fibers, place one drop of oil on the tip of the piper cleaner. Make sure the pipe cleaner absorbs most of the oil and continue to swab the inside of the basket. Finish by wiping the basket with a clean pipe cleaner - oil free - to collect any excess oil.

Reinsert the bobbin basket and bobbin. Screw the needle plate back in position and snap the bobbin cover in place. Your machine is now ready to stitch for hours of embroidery enjoyment!

Friday, January 29, 2010

Hands-on for 154? Yikes!

Tomorrow is a big day! My Stitching Sister, Marie Zinno, and I will teach 154 embroiderers at Jackman's Fabrics in St. Louis, Missouri. This will be the largest hands-on sewing class we've attempted. To get ready for the big event, we warmed up by teaching 85 embroiderers in Fairview Heights, Jackman's Illinois location this week. What a wonderful store, fabulous customers and staff. We did 10 projects in two days, every one flawless! Many of the attendees exclaimed, "When are you coming back to Jackman's? I want to do this again!"

So what's it's like to get ready for 154 embroiderers? Well, it's planning, shopping, cutting, and counting. Counting? Yep. Counting sheets of stabilizer, ribbons, silk flowers, flannel, batting, Magna-Quilters, Magna-Hoops, scissors, glue sticks, magnets, Angle Finders, hoop stands, etc. The list goes on and on but the counting is key. Our goal is to have every embroiderer succeed in our classroom. And I know from experience, if she doesn't have the right tools, she will struggle. So we count and recount until we're sure we have enough tools and supplies.

We are looking forward to teaching this group new techniques, shortcuts and tips that will enhance their embroidery experience. Marie and I are passionate about machine embroidery and love sharing our knowledge. And we learn so much from the students. They bring (and wear) gorgeous embroidery to show, to tell and to share. They make new friends who also love to embroider, they laugh with one another and they laugh with us. It's a fun two days, join us some time. Click here to see our schedule for 2010.

Friday, January 8, 2010

A New Year, a New Experience

2010 - a new year, a new decade. I vowed to kick it off in a new manner because I love to do, well ... new stuff! So this year, my sweetheart, Pete, and I accepted an invitation to join his siblings and their families in Northern Wisconsin for the New Year's weekend. Since my first inclination when packing a bag is to grab a bathing suit and head somewhere warm, this would be different. And was it! When we landed in Minneapolis/St. Paul, the temp was 3 degrees and diving. Bundled in layers, we headed north to a lovely cabin on Yellow Lake. Greeted by hugs and kisses from the whole family, we were off to a great start. Here's a pic of Pete and his sisters, Jody, Amy, Kathy and Tracy.

The next day, the temp was no higher - single digits but sunny. "Perfect for ice fishing!" the hardy Northerners said. Ice fishing? Are you kidding me? They don't sell fish in the grocery store here? lright, alright, I'll give it a go. Always slightly concerned about what I'll wear, I learned fashion takes on a whole new meaning when it comes to ice fishing. Function is way more important than style. Because if you're not warm, it's not fun. As you can see from the bundled crew (Tracy, Gary, Amy and Steve) - warmth is everything. Once garbed appropriately, it's fun to get out on the ice, stand around, drink beer (which I don't do but I am good at watching others do that) and cut holes in the ice with an auger.

In case you wondered what happens once you get the auger through the ice, I can tell you. The auger quickly pulls you down to the open water below! I think that's why the handle of the auger of wider than the hole. Thank heavens for that. Of course, once the hole is cut, you can catch fish! Here's Cory with a whopper!

It's silly, I'm a middle-aged woman (geesh, did I just write 'middle-aged?) and still excited about walking and DRIVING on a frozen lake. Ok, we didn't drive our rental car on the lake but I did have my first snow mobile ride. What a blast! We did more of the same the next day but this time Pete took me for a ride on the snow mobile on one of Wisconsin's lovely trails (they are meticuliously groomed). It was very romantic and made us feel like we were 16 again - well kinda - we had layers of clothes on and helmets that hinder any kind of communication so there's no murmuring of sweet nothings to each other.

But still, it's romantic. I think Pete felt the same way (the being 16 again part) because he peeled off the trail onto a virgin pond and sped across the white surface topping out at 75 mph. Once I saw that uncharted territory I knew he wouldn't be able to resist. And then when he spun around to go back to the trail, I saw there were two options - one a smooth, roundabout path to the trail and another - a steep short climb up to the trail. I knew we were headed for the steep climb so I held on then let go at just the right time when he rolled the snow mobile. Neither one of us hurt, a couple of rolled eyes and a heavily-gloved jab to his abdomen, we righted the snow mobile. And then engine cut off. He confessed that "he never really watched how his brother-in-law Gary Johnson started the thing. Oh cripe. It's 20 below and we're 8 miles from the house. So we gave it the old college try and after 7 or 8 attempts it started to purr. Off we sped. And sped. And sped. Until, a nice gentleman on a black snowmobile with blue and red blinking lights pulled up alongside us. I spotted the star on his jacket and could read 'Sheriff' even while moving 50 miles an hour. Since Pete's helmet limited his visibility, he just waved at him. And then waved again. Finally, (after what seemed like an eternity) he slowed down and stopped.

Well, turns out you need a current registration sticker posted on the snow mobile. We didn't know anything about the sticker, the registration, the rule. We gasped, "We're from Texas." Like that would give us a pass or something. But the sheriff was persistent. Asked Pete for identification (which he had, thank heavens) and started to write a ticket. Midstream, the sheriff paused and said, "Maybe it's in a compartment." We searched every nook and cranny. Found a baggie with LOTS of registrations. The sheriff handed each one back, "No not 2006, no not 2007, no not 2008."

Ugh! Had Gary changed his ways - legal for years then just disregarded all requirements? How much are those things anyway? Can we buy one right now from you, Mr Sheriff? Geesh, could you hurry up? It's freezing out here! And then finally, a piece of paper printed on Dec. 30, 2009 and good for 14 days until the stickers are mailed! It was our get-out-of-jail- free card! Yippee! We were free to go. We got a harsh warning about looking behind us (really, I don't know how you do that in all those clothes and a 10 lb. helmet while motoring along at 50 mph.), posting the registration sticker and obeying all traffic laws. We took him seriously though, after all, he's just doing his job and obviously loving it. He gets paid to ride the trails! Those Wisconsinites - hardy people of good stock! There are the kind of people you want with you in a fox hole.